Monday, September 29, 2014

Placing Glyphicons on Bootstrap Navbar

Bootstrap Navbar's appearance may be improved by adding Glyphicons on its items. Just place a <span> with classes .glyphicon and glyphicon-icon-name, e.g. glyphicon-home besides each navbar item

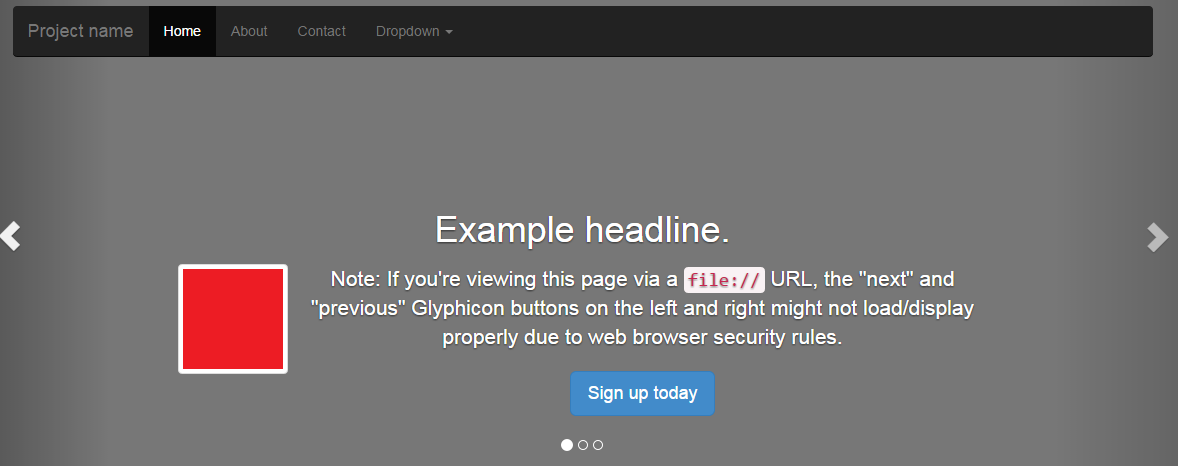
The navbar with icons next to each item as it appears on my laptop:


The same navbar is it initially appears in its collapsed state on my mobile is shown below:


The navbar on my mobile is now expanded. Icons appear beside each navbar item.


The codes in this posted were lifted from the samples in the tutorial links:
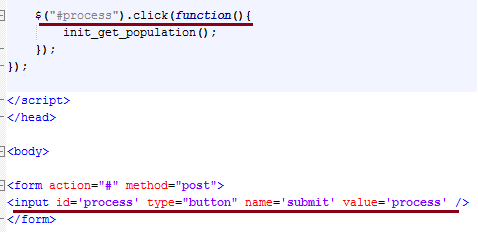
The  final code in its entirety is as follows:
<!DOCTYPE html>
<html lang="en">
<head>
<meta http-equiv="X-UA-Compatible" content="IE=edge">
<meta name="viewport" content="width=device-width, initial-scale=1">
<meta name="description" content="">
<meta name="author" content="">
<title>Example of Twitter Bootstrap 3 Responsive Navbar with Icons</title>
<link rel="stylesheet" href="css/bootstrap.min.css">
<link rel="stylesheet" href="css/bootstrap-theme.min.css">
<script src="js/jquery.min.js"></script>
<script src="js/bootstrap.min.js"></script>
<style type="text/css">
 .navbar{
  margin-top: 20px;
 }
</style>
</head> 
<body>
<div class="container">
    <nav role="navigation" class="navbar navbar-inverse">
        <!-- Brand and toggle get grouped for better mobile display -->
        <div class="navbar-header">
            <button type="button" data-target="#navbarCollapse" data-toggle="collapse" class="navbar-toggle">
                <span class="sr-only">Toggle navigation</span>
                <span class="icon-bar"></span>
                <span class="icon-bar"></span>
                <span class="icon-bar"></span>
            </button>
            <a href="#" class="navbar-brand">Brand</a>
        </div>
        <!-- Collection of nav links, forms, and other content for toggling -->
        <div id="navbarCollapse" class="collapse navbar-collapse">
            <ul class="nav navbar-nav">
    <!--icons are added on this navbar for improved appearance-->
                <li class="active"><a href="#"><span class="glyphicon glyphicon-home"></span> Home</a></li>
                <li><a href="#"><span class="glyphicon glyphicon-user"></span> Profile</a></li>
                <li class="dropdown">
                    <a data-toggle="dropdown" class="dropdown-toggle" href="#"><span class="glyphicon glyphicon-paperclip"></span> Messages <b class="caret"></b></a>
                    <ul role="menu" class="dropdown-menu">
                        <li><a href="#">Inbox</a></li>
                        <li><a href="#">Drafts</a></li>
                        <li><a href="#">Sent Items</a></li>
                        <li class="divider"></li>
                        <li><a href="#">Trash</a></li>
                    </ul>
                </li>
            </ul>
        </div>
    </nav>
</div>
</body>
</html>

Need help on some web coding task? Let me know about it. Email me at jrwxpun.dolor@gmqoapmssail.co57agsblm and I'll be more than happy to blog about it with my thoughts.

Hosting of the sample pages were provided for by the following:

Saturday, September 27, 2014

Using Nivo JQuery Plugin on Bootstrap

One limiting feature I found on Bootstrap Carousel is the transition effect. Although I found the slide-left and slide-right useful enough, I was interested in having effects such as fade-in, fade-out, etc. My Google search on how to apply transition effects on Bootstrap carousel did not provide much useful resource for me.

My next step was to check on Nivo slider, which I had used seamlessly in the past. Reviewing the documentation again plus gathering some tips on how to apply Nivo on bootstrap, I was able to come up with this page:
The screenshot on my laptop is shown below:


To see how Nivo would respond to mobile devices, I've checked on my smart phone:


Impressive enough for me.

The resources below allowed me to apply Nivo on Bootstrap:
The first link provides a download to the slider plug-in. From the downloaded files, I copied into my slider sample page.

The first set of files I copied was from the default theme css into my sample page's css:


The next set of files was from the JavaScript that came from the download:

Lastly, I've prepared images from photos my wife took :-)


With the files in place, I proceeded to work on the codes.

On the <head> tag, I've linked to the Nivo css files I copied:
<!--nivo stylesheets-->
 <link rel="stylesheet" href="css/nivo-slider.css" type="text/css" />
 <link rel="stylesheet" href="css/default.css" type="text/css" />


Next, I applied the Nivo tags within Bootstrap tags:
<!--nivo slider-->
 <div class="container">
  <div class="row">
   <div class="col-xs-12">
    <div class="slider-wrapper theme-default">
    <div id="slider" class="nivoSlider">
     <img src="images/02.png" alt="" />
     <a href="http://dev7studios.com"><img src="images/03.png" alt="" title="#htmlcaption" /></a><!---->
     <img src="images/04.png" alt="" title="This is an example of a caption" />
     <img src="images/05.png" alt="" />
    </div>
    <div id="htmlcaption" class="nivo-html-caption">
     <strong>This</strong> is an example of a <em>HTML</em> caption with <a href="#">a link</a>.
    </div>
    </div>
   </div>
  </div>
 </div>

Lastly, I've linked to Nivo JQuery and entered JQuery codes:
<!--Nivo JQuery scripts-->
 <script src="js/jquery.nivo.slider.pack.js" type="text/javascript"></script> 
 <script type="text/javascript">
  $(window).load(function() {
   $('#slider').nivoSlider();
  });
 </script>

The code in its entirety is as follows:
<!DOCTYPE html>
<html lang="en">
<head>
 <meta http-equiv="Content-Type" content="text/html; charset=UTF-8">
 <meta http-equiv="X-UA-Compatible" content="IE=edge">
    <meta name="viewport" content="width=device-width, initial-scale=1">
    <meta name="description" content="">
    <meta name="author" content="">

    <title>Nivo with Bootstrap</title>
 
 <link href="css/bootstrap.min.css" rel="stylesheet">

    <!-- Just for debugging purposes. Don't actually copy these 2 lines! -->
    <!--[if lt IE 9]><script src="../../assets/js/ie8-responsive-file-warning.js"></script><![endif]-->
    <script src="js/ie-emulation-modes-warning.js"></script>

    <!-- HTML5 shim and Respond.js IE8 support of HTML5 elements and media queries -->
    <!--[if lt IE 9]>
      <script src="https://oss.maxcdn.com/html5shiv/3.7.2/html5shiv.min.js"></script>
      <script src="https://oss.maxcdn.com/respond/1.4.2/respond.min.js"></script>
    <![endif]-->
 <!--nivo stylesheets-->
 <link rel="stylesheet" href="css/nivo-slider.css" type="text/css" />
 <link rel="stylesheet" href="css/default.css" type="text/css" />

</head>
<body>
 <div class="navbar-wrapper">
      <div class="container">
        <div class="navbar navbar-inverse navbar-static-top" role="navigation">
          <div class="container">
            <div class="navbar-header">
              <button type="button" class="navbar-toggle collapsed" data-toggle="collapse" data-target=".navbar-collapse">
                <span class="sr-only">Toggle navigation</span>
                <span class="icon-bar"></span>
                <span class="icon-bar"></span>
                <span class="icon-bar"></span>
              </button>
              <a class="navbar-brand" href="#">Nivo</a>
            </div>
            <div class="navbar-collapse collapse">
              <ul class="nav navbar-nav">
                <li class="active"><a href="http://getbootstrap.com/examples/carousel/#">Home</a></li>
                <li><a href="http://getbootstrap.com/examples/carousel/#about">About</a></li>
                <li><a href="http://getbootstrap.com/examples/carousel/#contact">Contact</a></li>
                <li class="dropdown">
                  <a href="http://getbootstrap.com/examples/carousel/#" class="dropdown-toggle" data-toggle="dropdown">Dropdown <span class="caret"></span></a>
                  <ul class="dropdown-menu" role="menu">
                    <li><a href="http://getbootstrap.com/examples/carousel/#">Action</a></li>
                    <li><a href="http://getbootstrap.com/examples/carousel/#">Another action</a></li>
                    <li><a href="http://getbootstrap.com/examples/carousel/#">Something else here</a></li>
                    <li class="divider"></li>
                    <li class="dropdown-header">Nav header</li>
                    <li><a href="http://getbootstrap.com/examples/carousel/#">Separated link</a></li>
                    <li><a href="http://getbootstrap.com/examples/carousel/#">One more separated link</a></li>
                  </ul>
                </li>
              </ul>
            </div>
          </div>
        </div>

      </div>
    </div>
 <!--nivo slider-->
 <div class="container">
  <div class="row">
   <div class="col-xs-12">
    <div class="slider-wrapper theme-default">
    <div id="slider" class="nivoSlider">
     <img src="images/02.png" alt="" />
     <a href="http://dev7studios.com"><img src="images/03.png" alt="" title="#htmlcaption" /></a><!---->
     <img src="images/04.png" alt="" title="This is an example of a caption" />
     <img src="images/05.png" alt="" />
    </div>
    <div id="htmlcaption" class="nivo-html-caption">
     <strong>This</strong> is an example of a <em>HTML</em> caption with <a href="#">a link</a>.
    </div>
    </div>
   </div>
  </div>
 </div>
 
 <script src="js/jquery.min.js"></script>
    <script src="js/bootstrap.min.js"></script>
    <script src="js/docs.min.js"></script>
    <!-- IE10 viewport hack for Surface/desktop Windows 8 bug -->
    <script src="js/ie10-viewport-bug-workaround.js"></script
 <!--Nivo JQuery scripts-->
 <script src="js/jquery.nivo.slider.pack.js" type="text/javascript"></script> 
 <script type="text/javascript">
  $(window).load(function() {
   $('#slider').nivoSlider();
  });
 </script>
</body?
</html>

Need help on some web coding task? Let me know about it. Email me at jrwxpun.dolor@gmqoapmssail.co57agsblm and I'll be more than happy to blog about it with my thoughts.

Hosting of the sample pages were provided for by the following:


Sunday, September 21, 2014

Text Transparency on Bootstrap Carousel Background

Taking one step further on my previous post, we now display text with transparency effect on Bootstrap carousel.

The carousel in its original format can be viewed on http://getbootstrap.com/examples/carousel/

The URL below demonstrates text transparency on Bootstrap carousel background on my portfolio website:
http://jundolor.eu5.org/bootstrapsamples/carousel01/

Feel free to download the files. The carousel as it appears on my laptop is shown below:

The carousel as it appears on my mobile is shown below:

Like the previous post, we remove or comment out the <img> tags before div class .container within the carousel. The <p> tags surrounding the buttons are replaced with <div> tags. In a while, css transparency on <p> and <h> tags will be applied. The buttons are to display with no transparency.
    <div class="carousel-inner">
        <div class="item">
          <!--<img src="data:image/gif;base64,R0lGODlhAQABAIAAAHd3dwAAACH5BAAAAAAALAAAAAABAAEAAAICRAEAOw==" alt="First slide">-->
          <div class="container">
            <div class="carousel-caption">
     <h1>Example headline.</h1>
     <p>Note: If you're viewing this page via a <code>file://</code> URL, the "next" and "previous" Glyphicon buttons on the left and right might not load/display properly due to web browser security rules.</p>
     <div><a class="btn btn-lg btn-primary" href="http://getbootstrap.com/examples/carousel/#" role="button">Sign up today</a></div>
            </div>
          </div>
        </div>
        <div class="item active">
          <!--<img src="data:image/gif;base64,R0lGODlhAQABAIAAAGZmZgAAACH5BAAAAAAALAAAAAABAAEAAAICRAEAOw==" alt="Second slide">-->
          <div class="container">
            <div class="carousel-caption">
              <h1>Another example headline.</h1>
     <p>Cras justo odio, dapibus ac facilisis in, egestas eget quam. Donec id elit non mi porta gravida at eget metus. Nullam id dolor id nibh ultricies vehicula ut id elit.</p>
     <div><a class="btn btn-lg btn-primary" href="http://getbootstrap.com/examples/carousel/#" role="button">Learn more</a></div>
            </div>
          </div>
        </div>
        <div class="item">
          <!--<img src="data:image/gif;base64,R0lGODlhAQABAIAAAFVVVQAAACH5BAAAAAAALAAAAAABAAEAAAICRAEAOw==" alt="Third slide">-->
          <div class="container">
            <div class="carousel-caption">
              <h1>One more for good measure.</h1>
     <p>Cras justo odio, dapibus ac facilisis in, egestas eget quam. Donec id elit non mi porta gravida at eget metus. Nullam id dolor id nibh ultricies vehicula ut id elit.</p>
     <div><a class="btn btn-lg btn-primary" href="http://getbootstrap.com/examples/carousel/#" role="button">Browse gallery</a></div>
            </div>
          </div>
        </div>
      </div>

The next step is to prepare the image for the carousel background. The fountain photo was taken during our visit to Fort Santiago :-)

The carousel comes with a stylesheet, carousel.css. Add the styles below. The <p> and <h> tags in the carousel are given a transparency effect. The fountain image is set as the background image. Originally, the text in the carousel have light color- a style declaration for class .carousel-caption converts color to black. Make changes as needed to adopt to your style and taste.
.carousel .carousel-inner {
/*Note url should point to where the image is relative to the css*/
background: url('../images/fountain.png') no-repeat center center;
background-color:#fff;

}
.carousel .carousel-inner .item .container .carousel-caption{
color:black;
}
.carousel .carousel-inner .item .container .carousel-caption h1, .carousel .carousel-inner .item .container .carousel-caption  p{
 background-color:#fff;
 opacity: 0.7;
 border: 2px solid;
    border-radius: 5px;
}

That should now display the carousel text with transparent effect while keeeping a background image.

Need help on some web coding task? Let me know about it. Email me at jrwxpun.dolor@gmqoapmssail.co57agsblm and I'll be more than happy to blog about it with my thoughts.

Wednesday, September 17, 2014

Applying Banner Background on Bootstrap Carousel

Banners may be placed in the background within Bootstrap carousel by applying some adjustments in the CSS. A screen shot of the carousel banner is shown below:


The template for the carousel can be downloaded from http://getbootstrap.com/examples/carousel/ comes with a carousel.css file. This is where the CSS will be adjusted.

I've designed a very simple banner that will go with the slide- a Nippon rising sun on black background, blackrisingsun.png:


The CSS for the background banner will position horizontally and vertically. Take note that we are designing for mobile devices as well. The design of the banner may be considered for this. Since the left and right sides will be clipped out, perhaps its a good idea to put emphasis on the center of the background.

The set of codes that display the carousel is as follows:
<div class="carousel-inner">
        <div class="item">
          <img src="data:image/gif;base64,R0lGODlhAQABAIAAAHd3dwAAACH5BAAAAAAALAAAAAABAAEAAAICRAEAOw==" alt="First slide"><!---->
          <div class="container">
            <div class="carousel-caption">
     <h1>Example headline.</h1>
     <p>Note: If you're viewing this page via a <code>file://</code> URL, the "next" and "previous" Glyphicon buttons on the left and right might not load/display properly due to web browser security rules.</p>
     <p><a class="btn btn-lg btn-primary" href="http://getbootstrap.com/examples/carousel/#" role="button">Sign up today</a></p>
            </div>
          </div>
        </div>
        <div class="item active">
          <img src="data:image/gif;base64,R0lGODlhAQABAIAAAGZmZgAAACH5BAAAAAAALAAAAAABAAEAAAICRAEAOw==" alt="Second slide">
          <div class="container">
            <div class="carousel-caption">
              <h1>Another example headline.</h1>
     <p>Cras justo odio, dapibus ac facilisis in, egestas eget quam. Donec id elit non mi porta gravida at eget metus. Nullam id dolor id nibh ultricies vehicula ut id elit.</p>
     <p><a class="btn btn-lg btn-primary" href="http://getbootstrap.com/examples/carousel/#" role="button">Learn more</a></p>
            </div>
          </div>
        </div>
        <div class="item">
          <img src="data:image/gif;base64,R0lGODlhAQABAIAAAFVVVQAAACH5BAAAAAAALAAAAAABAAEAAAICRAEAOw==" alt="Third slide">
          <div class="container">
            <div class="carousel-caption">
              <h1>One more for good measure.</h1>
     <p>Cras justo odio, dapibus ac facilisis in, egestas eget quam. Donec id elit non mi porta gravida at eget metus. Nullam id dolor id nibh ultricies vehicula ut id elit.</p>
     <p><a class="btn btn-lg btn-primary" href="http://getbootstrap.com/examples/carousel/#" role="button">Browse gallery</a></p>
            </div>
          </div>
        </div>
      </div>

Notice the <img> tags before the div class .container- this displays the background of each slide. This may either be removed or commented out:

Next, on carousel.css, add the style below. The background URL should point to the image.
.carousel .carousel-inner {
background: url('images/blackrisingsun.png') no-repeat center center;
background-color:#777;
}

This should now display the carousel with the background:


Need help on some web coding task? Let me know about it. Email me at jrwxpun.dolor@gmqoapmssail.co57agsblm and I'll be more than happy to blog about it with my thoughts.

Monday, September 15, 2014

Placing Thumbnails on Bootstrap Carousel

The sample Bootstrap I've come across on http://getbootstrap.com/examples/carousel/ provides a template for creating a running banner slide at the top of the page:


To add a thumbnail to each slide, minor tweaks will be done to the code.The class. carousel-caption inside the class .carousel-inner contains codes that display content on the running banner.


The initial step is to create a thumbnails to display. For this post, let's have three 100x100 images: red.png, green.png and blue.png.

To apply the first thumbnail, look for the first occurence of the class .carousel-caption. Add the class .media as shown below:


Next, add the image tag right above the first paragraph. Take note of the style applied:


This now displays the image on the slide as shown below:


Now, apply the steps while replacing the image on the remaining classes .carousel-caption:


Each slide in the carousel will now have the thumbnails:

Need help on some web coding task? Let me know about it. Email me at jrwxpun.dolor@gmqoapmssail.co57agsblm and I'll be more than happy to blog about it with my thoughts.

Saturday, September 6, 2014

IP Switching with AJAX-JSON using Recursion

In the last post, I showed an IP switching technique using AJAX-JSON. This checks on the first IP, and if determined not to be live, uses the second IP. This approach works fine if we're sure that at least one of the two IP addresses will always be live.

But what if there's a possibility that both IP addresses will be down? Or what if there's more than two IP addresses to test?

That would put a need for the testing of IP address to be repeated until we get a live IP or run out of IP address to test. The code for testing will be adjusted to apply recursion.

The adjusted code:
<!doctype html>
<html>
  <head>
    <title>IP Switch with JSON</title>
 <script src="jquery-1.11.1.min.js"></script>
 <script>
 
 $(document).ready(function (){
  function test_ip(Ip_arr, ctr, finalUrl){
   if(ctr < Ip_arr.length){
    var param = 'json_test.php?action=test&jsonp=?';
    var test_url = Ip_arr[ctr];
    $.ajax({
     url: test_url + param,
     dataType: 'json',
     timeout: 1000,
     success: function(jdata){
      var offset = ctr +1;
      finalUrl('IP' + offset, Ip_arr[ctr]);      
     },
     error: function(xhr, ajaxOptions, thrownError) {
      ctr += 1;
      test_ip(Ip_arr, ctr, finalUrl);
     }
    });
   }
   else{
    alert("No IP is available");
   }
  }
   
  function start_app(){
   var Ip_arr = ['http://aaa.aa.aa.10/', 'http://zzz.zz.zz.15/'];
   var ctr = 0;
   test_ip(Ip_arr, ctr, function(Ip_mode, ip){
    alert('IP mode= '+Ip_mode+ '/ IP: '+ip);
    //continue with code
   });
  }
  
  start_app();
 })
 
 </script>
  </head>
  <body>
  </body>
</html>

The start_app() function defines a variable ctr. This is the IP array element counter and keeps track of the current element. The initial value is zero, being the first array element in JavaScript. The element counter is passed as a parameter to test_ip() function.


When test_ip() function is called. A check is made if the element counter variable ctr has not yet reached the total array length.This means that there is an IP address to test and the code proceeds with the $.ajax call. Otherwise, the counter has reached the array length and there is no more IP address to test. An alert handles this situation.


If the check determines an IP address to test, a variable test_url is defined and takes the current element of the IP array. The variable is used on the url setting of the $.ajax call.


The error handler of the $.ajax call is triggered when the AJAX call to the url fails to return the JSON response. The variable ctr is incremented by one- this moves to the next element of the IP array. The call to test_ip() function is repeated.
Add caption


The test_ip() function is repeatedly called until a live IP is found or the testing runs out of IP addresses to test.

Need help on some web coding task? Let me know about it. Email me at jrwxpun.dolor@gmqoapmssail.co57agsblm and I'll be more than happy to blog about it with my thoughts.

IP Switching with AJAX-JSON

A web service may be published on more than one IP. In the diagram below a client can access a web service using hypothetical IP addresses on URL addresses:
  • http://aaa.aa.aa.10/web_service
  • http://zzz.zz.zz.15/web_service

This set up is typical for web services handling large volume request bandwidth. If one IP gets overloaded and becomes temporarily unavailable, a switch to the second IP is made.

A client may connect to the web service using an available IP. A routine PING check is made to see if the IP is live. When the IP becomes unavailable, adjustments are made to the web application to connect on the second IP.

This becomes a tedious approach since the check is made manually. The set of codes in this post presents one way to automate IP switching.

A test page on the web service will return a simple JSON response. The idea is for the client  to request the test page using IP#1. If after a defined period and no response was made, IP#1 is assumed to be down and switch to IP#2 is made.

For the test page, json_test.php, a simple JSON is returned as a response:
<?php
//json_test.php
//
header('Content-type: application/json; charset=utf-8');
header('Access-Control-Allow-Origin: *'); 
$function_name = '';
$source = '';
if (isset($_GET['jsonp'])){
 $function_name = $_GET['jsonp'];
}
$arr['id'] = 'test';
$arr['desc'] = 'ok to proceed';

$json = json_encode($arr);
echo "$function_name (\n";
echo $json;
echo ");\n";
?>


The web client making the JSON IP test is as follows
<!doctype html>
<html>
  <head>
    <title>IP Switch with JSON</title>
 <script src="jquery-1.11.1.min.js"></script>
 <script>
 
 $(document).ready(function (){
  function test_ip(Ip_arr, finalUrl){
   var param = 'json_test.php?action=test&jsonp=?';
   $.ajax({
    url: Ip_arr[0] + param,
    dataType: 'json',
    timeout: 1000,
    success: function(jdata){
     finalUrl('IP1', Ip_arr[0]);
    },
    error: function(xhr, ajaxOptions, thrownError) {
     finalUrl('IP2', Ip_arr[1]);
    }
   });
  }
   
  function start_app(){
   var Ip_arr = ['http://aaa.aa.aa.10/', 'http://zzz.zz.zz.15/'];
   test_ip(Ip_arr, function(Ip_mode, ip){
    alert('IP mode= '+Ip_mode+ '/ IP: '+ip);
    //continue with code
   });
  }
  
  start_app();
 })
 
 </script>
  </head>
  <body>
  </body>
</html>

The start_app() function fires up the web application. This creates an array of IP addresses to  test. This is followed by a call to test_ip() function with the array anonymous function as parameters.


The test_ip() function parameters takes the array of IP addresses to test and a reference to the anonymous function, finalUrl. The function starts with initializing a variable param to pass parameters on the URL. Take not of the jsonp parameter since the web client may make a cross domain call. This is followed by JQuery $.ajax() call.


The URL setting has the first IP in array and the variable param values, The timeout is set to 1 second- if after this period. If after this period, a JSON response was successful, the first IP is assumed to be live and passes this to the finalUrl anonymous function reference.

Otherwise, there was no JSON response on the timeout. The error handler calls the finalUrl anonymous function reference with the second IP.

The anonymous function is the heart of the web client application. The live IP is now used as needed:


Need help on some web coding task? Let me know about it. Email me at jrwxpun.dolor@gmqoapmssail.co57agsblm and I'll be more than happy to blog about it with my thoughts.

Tuesday, September 2, 2014

Keeping AJAX in sync

The front end of a web app needs to pick up data from a back end and do complex processing on it. An attempt would be to write AJAX on the front and process the returned data after the AJAX call. .

The JQuery code snippet below is triggered after an element with ID 'process' is clicked. An AJAX call sends a request variable, name of a city to a back end, which returns its population and stores to a variable. The variable is then alerted after the AJAX call.


The approach would seem perfect, except that the asynchronous part of AJAX lets the code continue the processing. While AJAX is still waiting for the response value, the application will continue to the next part of the code. The alert will show a null or undefined value.

So there is now a need to keep the execution of AJAX in sync with the remainder of the code. This can be achieved by using anonymous functions as parameter as shown below:

<!DOCTYPE html>
<html>
<head>
<meta charset="UTF-8">
<title>jQuery-AJAX-JSON</title>
<style>
div#result{
 color:blue;
 width:
}
</style>
<script src="jquery-1.11.1.min.js"></script>
<script>


$(document).ready(function (){
 function get_population(show_population){
  var city = 'Manila';
  var city_population = '';
  //execute ajax to pass requestvalues and get response output
  $.ajax({  
   url: 'get_population.php',
   type: 'post',
   data: { City: city},
   dataType: 'json',
   success: function(json) {
    city_population = json.population;
    show_population(city, city_population);
   },
   error: function(xhr, ajaxOptions, thrownError) {
    alert(thrownError + "\r\n" + xhr.statusText + "\r\n" + xhr.responseText + "\r\n" + "Err-01");
   }
   
  });
 } 
 
 function init_get_population(){  
  get_population(function(city, population){
   alert('Population of ' + city + ': ' + population);
   //continue processing the returned value
  });
 }

 $("#process").click(function(){
  init_get_population();  
 });
});

</script>
</head>

<body>

<form action="#" method="post">
<input id='process' type="button" name='submit' value='process' />
</form>
</body>

</html>

The anonymous function approach is similar to the click event handler. As soon as the element with ID 'process' is clicked, the function init_get_population() is called.


The init_get_population() will in turn call function get_population() but notice that the parameter being passed. Instead of typical value, an unnamed function is passed. This unnamed function is the anonymous function to keep our AJAX code is sync.


The anonymous function will in turn take in parameters of its own, variables city and population.

The function get_population() has the parameter- show_population,to "connect" to the anonymous function.


The function get_population initializes two variables, city and city_population. City will contain the value to be passed as request parameter to the AJAX call. City_population will contain the returned value.

The AJAX call will start with the settings show below. The back end URL called handles a Post HTTP request and return JSON formatted data.

The success setting below shows how the AJAX call will be in sync with the anonymous function. 

The variable city_population takes the returned population from the JSON response. The parameter show_population connects to the anonymous function will pass the city and an city_population values as parameters.
The call to the anonymous function lets us process the returned value as how we need it. Taking this approach, we are able to synchronize AJAX call with our code.

Got a question or have any web coding you'd like me to help you out? I'd be more than happy to assist you and blog about it!

Just drop me an email at jrundolor@gmamail.com and tell me more about it!