Sunday, April 23, 2017

JQuery code to restrict form entries to alphanumeric and force lowercase to uppercase

I've come up with a JavaScript/JQuery code that restricts form input entries to alphanumeric and at the same time forces lowercase letter entries to uppercase entries. Users entering the form may only type letters and numbers but when they type lower case letters, the entry gets converted to uppercase. The HTML code is listed below. A form with with ID "input-toupper" is where the user will type in their entry. The javaScript on script.js will restrict the entry to letters and numerals. But when a lowwercase letter is entered, it gets converted to uppercase.
<!DOCTYPE html>
<html>
<head>
 <title>Restrict enter and force lower to upper</title>
 <script src="https://ajax.googleapis.com/ajax/libs/jquery/3.2.0/jquery.min.js"></script>
 <script type="text/javascript" src="script.js"></script>
</head>
<body>
<form>
 <!--restricts entry to alpha number and forces lowercae to uppercase-->
 <input id="input-toupper" type="text">
</form>
</body>
</html>

The JavaScript contains the JQUery code for make this happen. The keydown event for the input checks against the regex to see if the character typed in is a letter or numeral. If the character entry does not match the regex, the entry is prevented on the input.
$(document).ready(function(){

 $('input#input-toupper').on('keypress',function(event){
  var regex=new RegExp("^[a-zA-Z0-9]+$");
  var key=String.fromCharCode(!event.charCode?event.which:event.charCode);
  if(!regex.test(key)){
   event.preventDefault();
   return false;
  }
 });
 
 $('input#input-toupper').on('keyup',function(){
  
  var toupper=$(this).val().toUpperCase();
  $(this).val(toupper);
 })
})

The jsfiddle link to the codes can be found here, https://jsfiddle.net/jundolor/sm0jjopm/

Thursday, April 13, 2017

Creating a radar monitor like animation using HTML5 and JavaScript

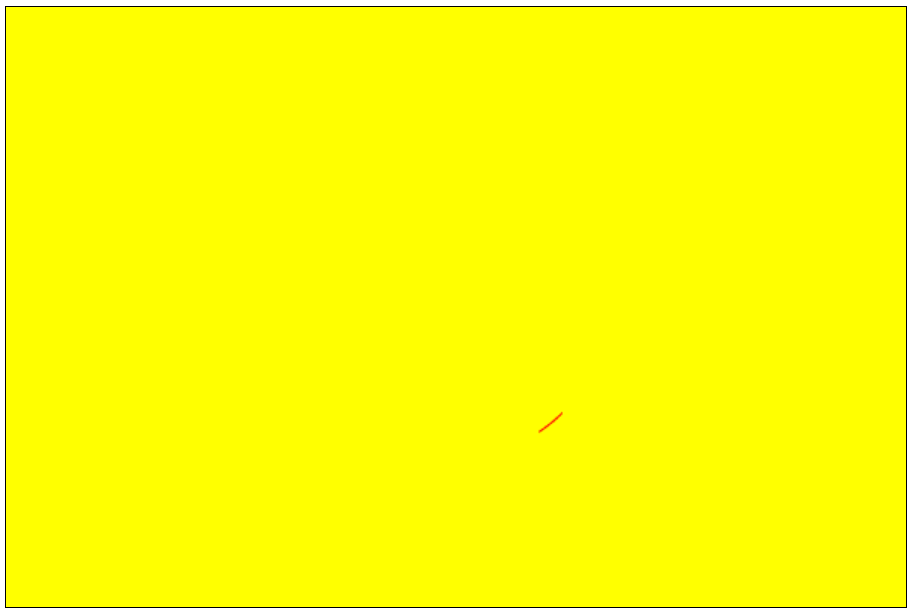
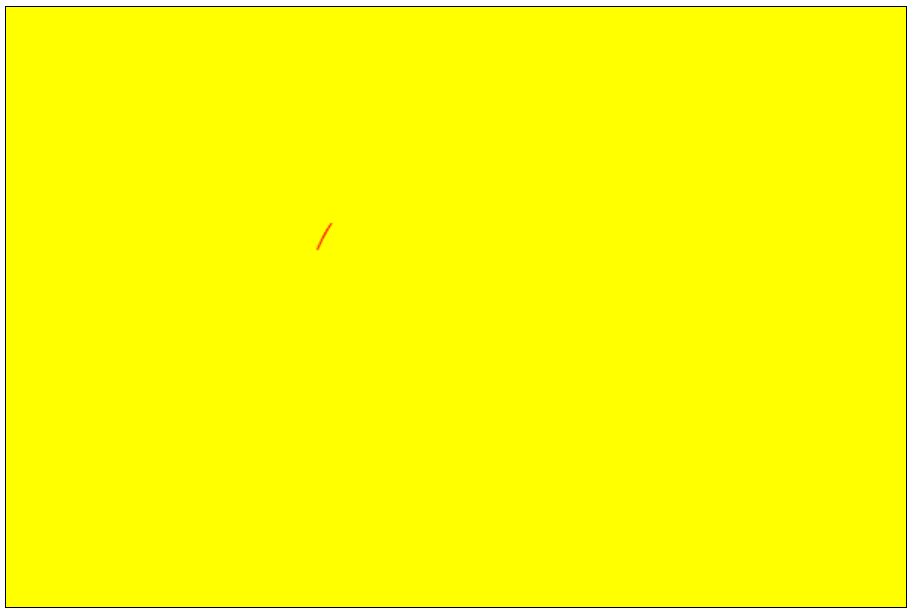
Using HTML5 Canvas and JavaScript, I created a radar monitor like animation-this where you see a line from the center to the end of a round screen, moving in a clockwise direction. The screen shots below shows how the animation works:


The HTML code defines a canvas (id:myCanvas) where the animation will happen. As soon as all HTML elements have been rendered, the function init() is triggered,


The CSS draws a border around the canvas.


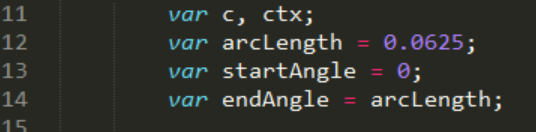
Just like the previous blog, the JavaScript code starts by declaring the c and ctx variables. These will hold the canvas HTML object and define the context of the canvas respectively. Unlike the previous blog wherein the arc angle parameters are in radians, I assigned the parameter values in degrees. The x1 and y1 variables will be the center position of the arc.


The function init() is called when all HTML elements have been rendered.


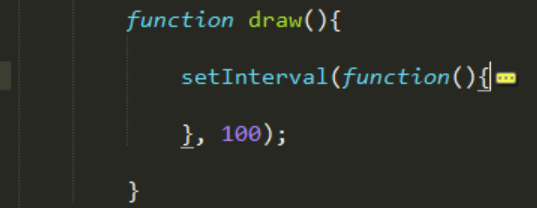
The function draw() calls the JavaScript built-in function setInterval(). Parameters are the callback function and millisecond interval when the callback function is triggered.


The callback function clears any previous drawn object by refilling the canvas with yellow color, i.e. gives an animating effect. The variables startAngle and endAngle are incremented with the arc length (degree). Once the endAngle reaches 360 (degrees), both startAngle and endAngle are reset to their default values. The arc lis drawn using degree values.


The x and y coordinates of the endAngle end degree are computed.


A line is drawn from the center of the arc to the end point defined by the x and y coordinates.


The code is listed below.

<!DOCTYPE html>
<html>
<head>
 <title>Animating circle</title>
 <style type="text/css">
  canvas{
   border:1px solid #000;
  }
 </style>
 <script type="text/javascript">
  var c, ctx;
  var arcLength = 30;//in degrees
  var startAngle = 0;//in degrees
  var endAngle = 360;//in degrees
  var radius = 100;
  var x1 = 300;
  var y1 = 200;

  function init(){
   c = document.querySelector("#myCanvas");
   ctx = c.getContext("2d");
   ctx.strokeStyle = "red";

   draw();
  }

  function draw(){

   setInterval(function(){
    //redraw the canvas
    ctx.fillStyle = "yellow";
    ctx.fillRect(0, 0, c.width, c.height);

    if(endAngle >= 360){
     //reset
     startAngle = 0;
     endAngle = arcLength;
    }
    else{
     //start where the last angle ended
     startAngle = endAngle;
     endAngle += arcLength;
    }

    ctx.beginPath();
    ctx.arc(x1, y1, radius, startAngle*Math.PI/180, endAngle*Math.PI/180);
    ctx.stroke();
    //ctx.closePath();

    // compute x and y coordinates of the end angle relative to canvas
    var x2 = x1 + Math.cos(endAngle * Math.PI / 180) * radius;
    var y2 = y1 + Math.sin(endAngle * Math.PI / 180) * radius;

    console.log('startAngle', startAngle);
    console.log('endAngle', endAngle);

    console.log('x2',x2);
    console.log('y2',y2);

    console.log('x2 end',x2|0);
    console.log('y2 end',y2|0);

    console.log(startAngle*Math.PI);
    console.log(endAngle*Math.PI);

    console.log('***');

    ctx.beginPath();
    ctx.moveTo(x1, y1);
    ctx.lineTo(x2, y2);
    ctx.stroke();
    //ctx.closePath();

   }, 50);
   
  }
 </script>
</head>
<body onload="init();">
 <canvas id="myCanvas" width="600" height="400"></canvas>
</body>
</html>


The code is also available at this jsfiddle link, https://jsfiddle.net/dyy5xtv2/

Running around in circle animation using HTML5 Canvas

Using HTML5 and JavaScript, I'll be creating a running around in circle animation effect. The screen shots below will show how the animation will look like:


The animation will consist mainly of drawing a portion on the circle at regular intervals. Each interval will clear the previously drawn portion and start the new portion where the cleared portion ended.

The HTML code creates a canvas with an id "myCanvas" width of 600px and height of 400px. As soon as all HTML elements are rendered, the JavaScript function init() is called.

The CSS code creates a black solid border around the canvas.
The JavaScript starts by declaring variables that will be used for the animation. The variable c will hold the canvas object while ctx will define the context of the canvas. The variable arcLength will be the portion of the circle that will be drawn, which is 1/16 of the circumference. The variable startLength will be set to initial zero. In HTML5, the value zero is positioned at the 3 o'çlock of the circle. The endAngle is end portion to be drawn.
The function init() is called when all HTML elements have been rendered. The document object function querySelector() identifies the canvas by its id and assigns it as an object to the variable c. The context of the canvas will be in 2D. The portion that will be drawn on the circle to create the animating effect will be in color red. The function draw() is called next.
The setInterval function called by draw() is a built in JavaScript function. This takes two parameters, a callback function, and the interval in milliseconds when the callback function will be called repeatedly.
The callback starts by refilling the canvas with the color yellow. The circle portion that was drawn in the previous call is covered by the refill of the canvas, i.e. cleared on the current call. HTML5 defines zero position at 3 o'clock of the circle; the position 2 closes the circle. When the endAngle reaches the position 2, both startAngle and endAngle are reset.  Otherwise, the startAngle takes the previous endAngle and the endAngle is incremented by the circle portion to be drawn.

The circle, or circle portion is drawn on the canvas.
The jsfiddle link to the full code is at https://jsfiddle.net/jundolor/bebyqpxq/

This is my  first attempt in creating animations using HTML5. In future blogs, I will attempt to create more complex animations.